A GRP water tank that is installed correctly will last 20 to 30 years with minimal maintenance. The same tank installed on a poor foundation or with improper panel assembly will develop leaks, joint failures, and structural problems within a few years.
Installation is not the most visible part of a GRP water storage installation – but it is the most important. This guide walks through the complete process, step by step, so that engineers, contractors, facility managers, and project owners know exactly what a proper GRP tank setup involves.
For technical specifications, sizes, capacity planning, and pricing, refer to our GRP Panel Tank Complete Guide.
What Makes GRP Tank Installation Different from Other Tank Types
Before getting into the steps, it is worth understanding why GRP water tank installation is a different process from installing a plastic tank or building a concrete tank.
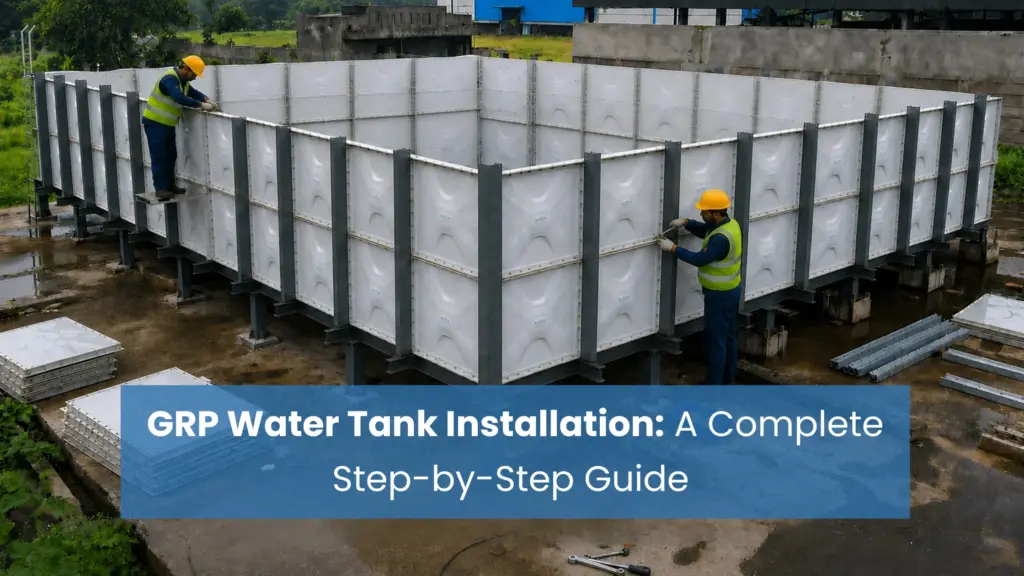
A GRP panel tank arrives as individual flat panels – not as a ready vessel. The tank is assembled on-site, panel by panel, using stainless steel bolts, EPDM rubber gaskets, and structural sealants. This means the quality of the installation directly determines the structural integrity and leak-resistance of the finished tank.
Unlike a plastic tank that is simply placed and connected, or a concrete tank that is constructed by a mason, GRP tank installation requires trained assembly personnel who understand panel alignment, torque specifications for bolts, gasket placement, and joint sealing sequence. This is why professional water tank installation service from a trained team matters significantly for GRP tanks.
Water Tank Installation Materials: What Goes Into a GRP Tank Setup
Before installation begins, the following materials are required:
GRP Panels
pre-fabricated modular panels in thickness ranging from 4mm to 12mm depending on tank capacity and structural requirement (commonly 8mm-10mm for mid-size tanks), in the configuration required for the specified capacity.
Stainless Steel Bolts and Nuts
used to bolt panels together at flanged edges. Stainless steel is specified to prevent corrosion at joints over the tank’s service life.
EPDM Rubber Gaskets
placed between panel flanges at every joint to create a watertight seal. Gasket quality directly affects long-term leak resistance.
Structural Sealant
Applied on the inner face of all joints after panel assembly to provide a secondary water seal and protect gasket edges.
Bottom Frame / Base Frame
a structural steel or RCC base frame on which the bottom panels are seated. This distributes the tank’s loaded weight evenly.
Inlet, Outlet, and Overflow Fittings
Stainless steel or HDPE fittings are installed through the panel walls at specified positions during assembly.
Manhole Cover
installed on the roof panel for access during cleaning and inspection.
Pre-Installation Requirements: What Must Be Ready Before Assembly Begins
Site and Foundation
The most critical pre-installation requirement is a properly prepared foundation. A GRP tank placed on an uneven or inadequately engineered base will develop panel stress and joint failure under the weight of water.
For ground-level installation
A level RCC (reinforced cement concrete) base slab is required. The slab must be designed for the full loaded weight of the tank – water weighs 1 kg per litre, so a 50,000-litre tank carries 50,000 kg of water load alone, before the tank’s own structural weight.
For rooftop installation
The terrace slab must be structurally verified to carry the full loaded weight of the tank. A structural engineer’s assessment is required before proceeding. The installation surface must be level and free of protrusions.
For underground installation
An engineered RCC pit is required with proper compaction, drainage provision, and anti-flotation anchoring to prevent the empty tank from lifting under groundwater pressure.
Access and Logistics
GRP panels are flat and relatively lightweight individually, which allows them to be carried through standard doorways, up staircases, and onto terraces. This is one of the practical advantages of GRP water tank installation for homes and buildings where large equipment cannot reach the installation site.
Confirm access routes for panel delivery before the installation date. For rooftop installations, panels are typically carried up manually or lifted using a rope-and-pulley system.
GRP Water Tank Installation: Step by Step
Step 1: Foundation and Base Frame Installation
Once the RCC base is ready and cured, the steel base frame is positioned and levelled on the slab. The base frame supports the bottom panels and distributes the load uniformly. All four corners and the centre of the frame must be at the same level – use a spirit level to verify before proceeding.
Any error at the base frame stage carries through to every panel above it. Level foundation is non-negotiable.
Step 2: Bottom Panel Laying
The bottom panels are the first panels laid onto the base frame. They are positioned panel by panel across the base frame, with EPDM gaskets placed at every flanged joint between panels.
Each panel is bolted to adjacent panels and to the base frame using stainless steel bolts. Bolts are tightened to the specified torque – over-tightening can damage the panel flanges, under-tightening leaves the gasket incompressed and prone to leaking.
Step 3: Side Wall Panel Assembly
Wall panels are assembled upward from the bottom panels, one row at a time. Each panel is bolted at horizontal joints (to the row below) and at vertical joints (to adjacent panels in the same row).
EPDM gaskets are placed at every joint before bolting. The assembly sequence follows the manufacturer’s panel layout drawing – panels are numbered and must be assembled in the correct sequence to maintain alignment and structural geometry.
For a standard 10 KL to 50 KL GRP tank setup, wall assembly typically involves 2 to 3 rows of panels.
Step 4: Fitting Inlet, Outlet, and Overflow Connections
Inlet, outlet, overflow, and drain fittings are installed through pre-drilled or site-drilled holes in the wall or bottom panels at specified positions. Fittings are flanged on both sides of the panel and sealed with gaskets and sealant to prevent leakage at the penetration point.
Positions for fittings must be confirmed against the plumbing layout before panels are assembled – relocating a fitting after wall assembly is difficult and creates additional penetrations in the panel.
Step 5: Roof Panel Installation
Roof panels are assembled last, following the same bolted-gasket method as the wall panels. Roof panels are typically supplied with internal cross-tie rods that connect opposite walls and prevent the tank walls from bowing outward under water pressure.
The manhole cover is fitted into the designated roof panel during this stage.
Step 6: Internal Sealant Application
After all panels are assembled and bolted, a structural sealant is applied on the inner face of every joint – bottom-to-wall, wall-to-wall, wall-to-roof, and at all fitting penetrations. The sealant provides a continuous secondary water barrier and protects gasket edges from long-term water exposure.
This step must not be skipped or rushed. Sealant application is done systematically, joint by joint, and allowed to cure before the tank is filled.
Step 7: Water Fill Test and Leak Inspection
Before the tank is connected to the water supply system, it is filled slowly with water and inspected at every joint for leakage. The tank is typically held at full capacity for 24 hours during the initial fill test.
Any joint showing seepage is identified, drained to below that point, re-sealed, and retested. The tank is commissioned for use only after a clean fill test with no active leaks.
How Long Does GRP Water Tank Installation Take?
This is one of the most commonly asked questions by project managers and facility teams planning around construction timelines, as GRP water tank installation takes approximately 1 to 5 days, depending on tank capacity and site conditions.
For a standard GRP tank setup:
| Tank Capacity | Approximate Installation Time |
| Up to 10,000 L (10 KL) | 1 day |
| 10,000 L to 50,000 L | 1 to 2 days |
| 50,000 L to 1,00,000 L | 2 to 3 days |
| Above 1,00,000 L | 3 to 5 days |
These timelines assume foundation is ready before the installation team arrives, access to the site is clear, and a trained installation team of 3 to 4 personnel is working.
This speed is one of the key differences between GRP water storage installation and a concrete tank construction – a comparable concrete tank takes 3 to 6 weeks including curing time.
Small GRP Water Tank Installation: For Homes and Residential Buildings
For small GRP water tank installation in homes and small residential buildings, the process is the same as described above – but on a smaller scale.
A 1,000-litre to 5,000-litre rooftop tank for a home typically consists of 4 to 8 panels and can be assembled by 2 trained personnel in a few hours. The foundation requirement is a level RCC surface or a steel platform verified for the tank’s loaded weight.
For GRP water tank installation for homes, the access advantage of flat modular panels is particularly useful – panels can be carried up a standard staircase and assembled on the terrace without any lifting equipment.
GRP Water Tank Installation for Factories and Industrial Projects
For GRP water tank installation for factories and large industrial projects, the scale and complexity increase – but the process remains the same.
Industrial installations typically involve ground-level tanks of 50,000 litres and above, often with fire reserve partitioning within the same tank. Foundation engineering for large industrial tanks requires a structural assessment to handle the full loaded weight, and installations in active factory environments require coordination with operations teams to manage site access and downtime.
For industrial projects, a professional water tank installation service with documented experience in large-capacity GRP installations is strongly recommended. Post-installation, a commissioning report and leak test documentation should be obtained before the tank is connected to the supply system.
Conclusion
A GRP water tank installation done right is a one-time investment that delivers 20 to 30 years of reliable, low-maintenance water storage. The process – from foundation preparation to the final fill test – follows a defined sequence, and each step builds on the one before it. Skipping or rushing any stage creates problems that are expensive to fix after the tank is in service.
Whether it is a small rooftop tank for a home or a large industrial reservoir for a factory, the installation principles remain the same: a solid foundation, trained assembly, correct materials, and a clean fill test before commissioning.
Frequently Asked Questions
1. What does GRP stand for in water tank installation?
GRP stands for Glass Reinforced Plastic. In water tank installation, GRP refers to the composite panel material made from glass fibre and high-grade resin that is used to construct the tank walls, floor, and roof. The material is non-toxic, non-corrosive, and approved for potable water storage.
2. Is GRP tank installation different from other types?
Yes. Unlike a plastic tank that is placed as a single unit, a GRP panel tank is assembled on-site from individual flat panels. This requires trained personnel, proper bolt torque, gasket placement, and sealant application – steps that do not apply to single-piece tanks. The advantage is flexibility in size and the ability to install the tank in locations where a pre-formed vessel cannot reach.
3. What materials are used in GRP water tank installation?
GRP water tank installation requires GRP panels, stainless steel bolts and nuts, EPDM rubber gaskets, structural sealant, a base frame, inlet/outlet fittings in stainless steel or HDPE, and a manhole cover. A properly prepared RCC foundation is also required before assembly begins.
4. Are GRP tanks suitable for drinking water?
Yes. GRP panel tanks are manufactured from food-grade, non-toxic materials that do not leach chemicals into stored water. The opaque tank design blocks light penetration, which significantly limits algae growth, while the smooth inner surface reduces bacterial buildup and simplifies cleaning. GRP tanks are widely used for potable water storage in homes, hospitals, hotels, and schools across India.
6. What is the cost of GRP water tank installation in India?
Installation cost typically varies based on tank capacity, installation type (ground-level, rooftop, or underground), and site conditions such as access and foundation work required. For an exact installation cost, refer to the capacity-wise pricing in our GRP Panel Tank Complete Guide or contact HP Engineers for a site-specific quote.